Friday, December 28, 2012

Lower Salmon River Squash

Since Boat Building Season is over, it's now Planning Next Year's Garden season.  I have the basics in our garden- strawberry and asparagus patches, along with a growing rhubarb and a 2nd year nectarine tree.   But I want something more, something I can stash away in the pantry for those long winter days.  Like a winter squash.

So after digging around, I found exactly what I'm looking for- a gorgeous squash that stores well- and it's called the Lower Salmon River squash, which is native to the Pacific Northwest and is an endangered plant (information from Renewing America's Food Traditions). 

I stumbled upon it at Marishabee's Blog

She writes:
This year I grew only one variety of winter squash:  Lower Salmon River.  I chose this squash because it is fabulous for winter storage.  In fact, it will store so well that my partner says that we need a bandsaw to cut through it (we can process it with standard kitchen utensils too).
See?  That's what I want! 

If you're looking for something different to grow, and would like to help preserve and endangered plant,  you can buy seeds from Seed Dreams.

Alternatively, if we're neighbors/friends, I might be willing to share some of my stash.   But you will be subjected to a growing competition.  You've been warned!

Happy garden planning! 

Saturday, September 29, 2012

Nail Polish Storage

I've always been crap at being a lady, much to the disappointment and chagrin of my dear mother.  That said, I do have a feminine Achilles heel, and that, my friends, is Essie nail polish.

I refuse to use anything else.  Honestly.  And I have stopped going to the salon for manicures or pedicures because my nails chip 30 minutes after walking out of the salon, EVERY TIME.  And if you're paying $40 to have your nails done, it better damn well last longer than half an hour. 

Anyway, I had some scrap okoume from the boat build lying around, along with a cedar 2x2, so I thought I'd make myself a little Essie nail polish shrine. 


They need to be finished but I'm so pleased with how they turned out. 

Monday, September 3, 2012

First Time at the Dog Park

 
Our Cardigan Welsh Corgi is turning into quite the socialite/water dog! As much as I give him grief for being so daft, he is such a delight to have around.

Photos by the husband, more here if you're interested!

Saturday, September 1, 2012

Camping at Dosewallips: A Photo Summary.

We went camping at the Dosewallips State Park last weekend.


I love the Pacific Northwest.


Monday, August 20, 2012

Happy One Year, Casa Crustante! A Year in Review.

Today marks ONE YEAR since moving into our little Casa Crustante.   It took us 80 days of renovation to make this little home habitable, along with plenty of tears, a mountain of paperwork, and gallons of alcoholic beverages.

It looked like this:
With a shed like this:


An interior like this:


Then we gutted it.  Seriously gutted it.


But soon, the transformation was complete.  Our little foreclosed house evolved.  


The shed transformed into something less hideous:


The kitchen ended up being something worth cooking in:


Once we moved in, the momentum continued.  A chicken coop was started.

 And finished.

Baby chicks were hatched.

Those chicks quickly grew up.


A corgi was added to the family.


A boat started.


Not a bad first year of home ownership.  Onwards!

Thursday, August 16, 2012

Honoring Nicola Tesla.

So, if you're friends with me on Google+ or on twitter, you know I've been spamming your feed with Nicola Tesla fundraising info.  Sorry about that.   Actually, no, not sorry at all.

Did you know that there's a non-profit that is attempting to buy the land that Tesla worked on to create a museum in his honor?  True story. 
Tesla's final laboratory is located in the sleepy town of Shoreham, New York.  It's known as Wardenclyffe and it's where Tesla attempted to build a tower that would provide free wireless energy to the entire earth. Unfortunately, Tesla lost his funding before the project was completed and in 1917 the Wardenclyffe tower was demolished.  Subsequently, the land was sold to a film and paper manufacturer.

However, the land, laboratory, and foundation beneath the tower are still there and very recently went up for sale. And right now a non-profit is trying to buy the property and turn it into a Nikola Tesla Museum. The property is listed at $1.6 million, and this non-profit has received a matching grant from New York State of up to $850k.  This means that if we can raise $850k, New York State will match us for that same amount -- putting the total raised at $1.7 million.
More info here


As of this post, the fundraiser is OVER HALFWAY THERE! This can be a reality, and I think it's a beautiful way to honor his memory and accomplishments.

Sunday, August 12, 2012

New Blog for Boat Building Related Stuff!

Remember how I said I wanted to keep everything on one blog?

I lied.

Well, not intentionally.  It's just that this boat is taking over my world in such a way that it's eclipsing everything else in my life.

And at this point, I want to post about other things occasionally, but I feel almost guilty to those of you who are trekking across the internet to read about my Scamp to do so.

So, I did some searching, and found that the domain buildingasailboat.com, was available.  It was too perfect to pass up.  I bought it, and now my boat building adventures and everything that is associated with it will have a dedicated home.

Yes, I will continue to update this page occasionally with boat stuff, but I'm hoping to start talking about other things in life too.  Like the AMAZING handbag I just bought,  and how massive my turnips in my raised bed garden are getting.  

If you don't want to update your links, I understand!   The button on the top of my page will shuttle you over to the new blog.

In other news, I SAILED ON A SCAMP YESTERDAY! And it was fantastic.  There is something remarkable about this boat, and I'm so glad that I've picked this design. 

Sunday, August 5, 2012

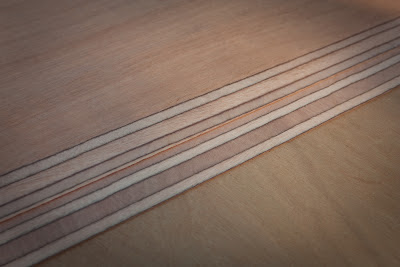
Cross section of Scarf Joint.

Check out this cross section of the scarf joint:


That West System Scarffer is nice.  I'm sure I could have managed a rough scarf with a block plane, but I doubt the plywood layers would have lined up as nicely as this.  Good day so far!

Saturday, August 4, 2012

31st Anniversary of the NW School of Wooden Boatbuilding

Today was the 31st anniversary of the Northwest School of Wooden Boatbuilding.

Photo stolen from my husband.

Not only did we have a chance to visit their beautiful school, but we also had the chance to ogle SCAMP #1 AND meet the designer, John Welsford.


The first time I saw a photo of a SCAMP I laughed.  She wasn't, or so I thought, what I was looking for.  But then, I saw her in motion.  Such purpose.  Such intent.  And in my heart I knew, absolutely, that'd she'd be perfect for us. 


 Sigh. 

Enough waxing poetically. Progress update!

Centerboard lead has been epoxied in place (6x6" pieces, each 3/32" thick, 14lbs worth).  My centerboard now weighs a little over 30lbs, not including the final fiberglass sheath. 

Hole cut out:

14lbs of lead, in place.


1/4"  Meranti cap (I thought it'd save on epoxy and that it'd result in surface that's easier to sand).


And three bulkheads and the stem have been epoxied.


And I've finally gotten around to scarffing together my hull bottom  I'll be cutting it out and epoxying it first thing tomorrow!


I've done the remaining steps in my head, and I'm beginning to realize that I may have a 3D boat sooner than I think.  Everything required to start a boat-like shape should be done by next Saturday.   Excited doesn't even begin to explain it.


So, does the above bulkhead remind you of George Carlin, or of Mr. Mackey?

Thursday, August 2, 2012

Epoxy Coating Initiated.

I haven't posted about the boat because there simply hasn't been much to post.  I've been plinking away, one day at a time, on a variety of uninspiring boat related things.

Right now I've got one side of three bulkheads and the stem epoxied.  I'm amazed, quite frankly, by how many insects feel inspired to die on a resin coated piece of plywood.  I can't help but feel that someday, when the majority of life on earth has been snuffed out, a technologically advanced species will be able to use my boat's insect-glued bulkheads to recreate what the Pacific Northwest was like in the 21st century.

Also, I have a hard time NOT whisking the epoxy.  By the time I realized what I was doing I had introduced so many bubbles that the first bulkhead I coated looked like a rough interpretation of Starry Night.

So, yeah, don't do that.

Oy.


Onwards!

Wednesday, July 25, 2012

A Cat Crap Palace.

The puppy, though cute, is a bit of a handful.  He's nearly 6 months old now, full of vim and vigor, and he manages to get into all sorts of mischief.   He's into the usual doggy sports- i.e. digging through my vegetable garden and eating cat litter.

Yes.  He eats cat litter.  With a side of kitty roca.  With gusto.  Imagine my joy upon finding him zooming through the house with a fresh cat turd firmly held in his mouth.   Oh, there were words, all right.  And the requisite call to my husband "WHY DID YOU WANT A $#(@ing PUPPY!?"

Thankfully, I use a wheat cat litter, so at least I know that it's somewhat edible and it's (hopefully) not going to impact his intestines.  But there's something REALLY annoying about having to stash away the litter box every time I let the dog roam the house. 

Something had to be done.  And without further ado, I present to you the Cat Crap Palace in its currently unfinished glory.  Sturdy (extravagant 2x4 construction), an entrance only big enough for the cat, and complete with plenty of ventilation,  I'm really hoping this will work.


 And as it sits now, with a bit of primer. 


Guess how much I'd rather be working on my boat?!


He'd better grow up to be a water dog!

Monday, July 23, 2012

Scarffing Made Easy.

My West System Scarffer showed up on Wednesday, and wow.  To put it simply- it's amazing.


The hardest thing about this tool was mounting it onto the skil saw, and even that was pretty straight forward.  Once it was in place, serious scarffing started to happen.


My greatest respect goes to those of you who can scarf by hand.  But for me, this tool has been a time saver.   In less than two minutes I had a perfect 1:8 scarf across a 4' plywood panel. 


Worth every penny.

Thursday, July 19, 2012

Two Centerboard Halves, Both Alike in Dignity

I had two centerboard halves that were very close to being done.   They do need a bit more sanding, but I wanted them glued together for the final shaping. 

 Which meant one thing:  IT'S FINALLY TIME TO PLAY WITH EPOXY!!  

So I stacked my boards together as perfectly as I could, clamped them down, then drilled three holes through the top board, halfway into the bottom board.   I pulled the boards apart, then inserted three dowels into the board that was on the bottom.

At this point, I sanded the boards lightly to clean them up, then I mixed some epoxy, and applied two coats on both of the boards.   I sandwiched the halves together, aligned the dowels and the holes, tapped them in place, and clamped them together. 

It feels great to work with epoxy again. It's really fantastic stuff.   Speaking of which, I'm using AeroMarine Epoxy.  It's sold for an attractive price point, and those who have used it seem to like it.  I'm intrigued to know how it turns out!  And if it doesn't, well, I guess I'll have to switch brands when I build the next boat. 

In other boat related news: 

My hatches showed up yesterday. Do these look white to you?  Note the envelope used as a color reference.

Yeeeah.  They were returned.  The seller was very sympathetic, and next-day-aired the replacement hatches.  No complaints here!

Monday, July 16, 2012

Boat Update of No Update.

Minor victories:

70% of the 9mm pieces have been cut out.  There are a few giant ones remaining, notably, anything that requires a scarf (scarfing is the term used to describe joining two pieces of wood together).  On Rio, that involves the hull bottom and the cockpit sole, along with the planks and the deck. 

After practicing scarffing with my block plane, I've determined that there's NO way I'm going to be able to use just a block plane for the entirety of my scarfs. It would be feasible to do so on the planks, but on the larger pieces (the hull bottom and cockpit sole), it'd take a considerable amount of time.   So, I purchased the West System Scarffer.   It should arrive on Wednesday.

And all of the lightening holes have been cut out:


I've purchased the hatches for bulkhead #3.  I'll be using the 13x17 Tempress hatches

Slow and steady.  

Tuesday, July 10, 2012

Discussing the Centerboard. Again.

I stumbled onto this webpage with a simple description of how to make a foil with a router- no jig required.  And it made a great deal of sense to me.

And then great things started to happen.

Brief summary-  After consulting the plans to figure out the shape of the foil, we made a list of offsets to mark on the blanks.  We basically broke down the centerboard cross section into measured increments, a bit like a topographic map.


After we had all the lines marked, we used the router to cut out each section.


Like this:


Then I used my block plane to smooth it all out.


I'm quite pleased with the cross section- it's starting to look like a foil!  I'm finally heading in the right direction.


I'm a long ways away from being finished with it, but I foresee great things in this centerboard's future.    Plus, it's the last of my 3/4" Okoume, so I had better get this one right.